Sunday, December 25, 2011

Happy Holidays to you all

Happy Holidays

Wishing you all "Happy Holidays"
Enjoy the rest of 2011 as if you were eating a cup of chocolate pudding
you will smile after you finish every bit of it !!
Then you are ready for another cup...

"Happy New Year"

Wednesday, December 21, 2011

Grilled fermented cassava

Peuyeum bakar / Grilled fermented cassava


Can't believe time flies so fast and 2011 will be over soon. December is like a festive month for me, Christmas and New Year. Yes...party, party, party ! I'm very enthusiastic with the upcoming festive season. For you who celebrate Christmas, I'm sure you already chose what you want to serve for your family. Everyone will be serving their best foods !

While I do not celebrate Christmas, but I will post good foods. Like the grilled fermented cassava which is suitable for tea time or late night snack. It's an alternative snack you can munch on new year's eve. :D Perhaps you could serve it to your guests on Christmas as well.

Fermented cassava is made from cooked cassava. The fermentation process is by adding yeast on top of cooked cassava. Store it for 3-5 days in air-tight container before being used. I never make fermented cassava since I can find the sellers easily in traditional market. But hey...it's worth a try to make some with my son for his homeschooling project :D

It's not Christmas yet, but I already got a present ! Remember the Foodography Photo Contest I mentioned on my previous post ? I won the first prize and also deserve a camera locket necklace !!! Check out the announcement here. Talking about gift, I will celebrate my 2nd blog anniversary next month. Wait for the announcement because I have something for you :)

Grilled fermented cassava

Ingredients :
- 250 gr fermented cassava
- 2 tsp margarine
- 1 tbsp sugar
- chocolate sprinkle
- sweet condensed milk (plain)

How to :

1. In a bowl, mix fermented cassava, margarine and sugar until well-blend.
2. Place a non-stick pan over low heat. Take about 3 tablespoons of fermented cassava mixture and grill. Shape into square (the size is up to you) and cook until golden brown on each sides.Remove from heat.
3. Serving : place the grilled fermented cassava on a plate. Pour sweet condensed milk and sprinkle with chocolate sprinkle. (you could also sprinkle grated cheese if you like)

Peuyeum bakar / Grilled fermented cassava

Bahasa Indonesia

Bahan :
- 250 gr tape yang matang , buang bagian tengahnya (ambil dagingnya saja)
- 2 sdt margarin
- 1 sdm gula pasir
- mesis (untuk taburan)
- susu kental manis (untuk coretan)

Cara:

Campur tape,  margarin dan gula pasir sampai rata dan halus.
Lalu dibentuk kotak2 / bebas (kalau saya dibentuk kotak di atas wajan anti lengket tidak usah pakai margarin lagi dan langsung dimasak sampai kecoklatan)
Penyajian, tata tape bakar di atas piring coretn dengan susu kental manis dan taburkan mesis.


This post is also an entry for IFP (Indonesian Food Party).


Enjoy.....


Wednesday, December 14, 2011

Simple eggnog

(Homemade) - Simple eggnog


When my son suddenly came rushing into my room and said, "I want to make eggnog !", I was really surprised. What is eggnog anyway ? And how did he know about it ? So, I just answered him with "Okay". Google is always be my hero in that situation. All I need to do is only type the right keywords, and voila.... :)

Eggnog is egg-based drink with milk/cream, sugar, liquor and a sprinkling of ground cinnamon and nutmeg. In US and Canada, eggnog is popular and associated to Thanksgiving and Christmas celebrations. Since it consists raw eggs, I search for the simplest and not using too much eggs. Some recipes using only egg yolks, so I just have to skip that (I don't want to waste too much egg whites).

Simple eggnog
(adapted from http://www.savvyhomemade.com/homemade-eggnog.html)

Ingredients:
- 4 eggs
- 5 tablespoons sugar
- 1 1/2 teaspoon vanilla extract
- 1 teaspoon nutmeg
- 4 cups milk
- 2 tablespoons brandy (I don't use this)

How to :

1. Whisk the eggs and sugar together in a large bowl until the sugar is dissolved.
2. Whisk in the vanilla extract, half of the nutmeg, milk and brandy.
3. Cover the bowl with plastic wrap and chill.
4. When you're ready to serve, pour the eggnog into glasses and sprinkle a little nutmeg across the top to serve.


Enjoy......

Wednesday, December 7, 2011

Cendol, a guest post from Marvie @Lekkericious

I proudly present to you, the first guest post on my blog ! Let's say it's an exchange post. After my guest post on her blog few months ago, and now it's her turn to write something on my blog. :D Marvie Yap from Lekkericious is a dear Filipino friend who has a lot of activities. From Software QA Engineer, make-up artist, cook, cat rescuer and food blogger. I can imagine she is extremely busy. :) Though we never met, but we still can be best friend. This is one of the reason what makes me happy for having friends from around the world.

Once Marvie told me that she loves cendol on my photo of cendol on Flickr but she couldn't find the seller near the neighborhood. So, I appreciate that she finally tried to make it. Nothing can beat homemade ! Without further ado, I welcome Marvie to show her cendol feast.

*************************************************************************************

I first learned about cendol in Holland, during my summer visit in 2009. It was funny to have the first taste of this asian delicacy in a western country, when I have lived all my life in Asia. Es Cendol is a green, worm-like jellies made from rice flour, tapioca flour and mung bean flour served with coco palm sugar syrup, coconut milk and shaved ice, topped with jackfruit - a very popular drink/dessert in Indonesia. Cendol was a love at first taste experience. I was in constant search for it here in Manila, but unfortunately, it's not available anywhere. I find it odd that I could never find it in any of my favourite Asian restaurants around the city when it is super popular in Indonesia, Malaysia, Thailand and Vietnam, our neighboring countries.

Marvie's Cendol

So I did a little research how to make it for myself and for my husband who also loves this Indonesian delicacy.

Finding the right ingredients was a bit of a challenge for me though - gula jawa and mung bean flour in particular. I scoured all specialty Asian shops for these and didn't have any success. Nevertheless, I found coco sugar, the closest alternative I can get for gula jawa, although in my opinion, gula jawa's sweetness complexity still is the best. I gave up on mung bean flour and settled for the rice flour and tapioca flour combo - which ended up in a disaster. My cendol just melted a few minutes after it's submerged in the ice water. Although most Indonesian cendol recipe say it's just rice and tapioca flour, for some reason I couldn't succeed. So I thought the mung bean flour was the only key, and I don't have it.  After numerous attempts with rice flour and tapioca flour in different proportions, I finally called it off and decided to wait on my cendol dreams. But thanks to Tika, she revived my cendol hopes and sent me that precious mung bean flour. I finally made my first successful cendol!

Marvie's Cendol

Cendol
In this recipe, I only used mung bean flour

Ingredients:

Cendol Jellies
- 80g mung bean flour
- 500ml water
- green food coloring
- pandan leaves (or pandan flavor)
- 3 tbsp white sugar
- iced water in a bowl
- colander

Coconut Milk

- Kara Coconut Cream (or better, fresh coconut and get the "kakang gata" or the first milk)
- pandan leaves
- salt

Syrup
- 250 coco sugar, or coco palm sugar
- 250ml water
- Pandan leaves

Cendol Jellies Preparation :

1. Dissolve the mung bean flour in 500ml water.
2. Add few drops of green food coloring until you reach the color of electric green. You may also use pandan leaves to make the color natural.(To do this, put pandan and 500ml of water in a blender. Sieve and
take the liquid extract and use that to dissolve the mung bean flour).
3. Add sugar and 1 tbsp of pandan flavor, stir until dissolve.
4. Set your stove in low heat and begin stirring the mixture in a pot. Continuously stir until it thickens.
5. When it's paste like and super thick turn off the heat and get ready to mold!
6. Put the colander on top of the iced water.
7. Pour the cendol thick mixture on the colander and start scraping back and forth with a use of a spatula. The holes in the colander will serve as your mold to make that little green worms. DO NOT WAIT TOO
LONG, otherwise when it gets cold it will be hard to mold.
8. When done, set aside.

Syrup Preparation :
1. Combine coco sugar and 250ml water in a pot, in low heat.
2. Stir until sugar's dissolve.
3. Make a knot out of about 4 pandan leaves and simmer it together
with the sugar. If you don't have pandan leaves, just add 1 tbsp of
pandan flavor.

Coconut Milk Preparation :
1. Heat the coconut cream (kakang gata) in a pot using low-heat.
2. Add about 2 tbsp. pandan flavor, or make a knot out of pandan
leaves and put it in the milk.
3. Add a dash of salt.
4. Turn of the stove when it starts to bubble.

To serve:

In a glass or bowl, layer it with coco sugar syrup, cendol jellies,
crushed ice, and coconut milk. You can top it with fruits like langka
(jackfruit) or banana. Add more cendol jellies on top if you wish.

Thursday, December 1, 2011

Brownie in cups

(Homemade) - Brownie in cups


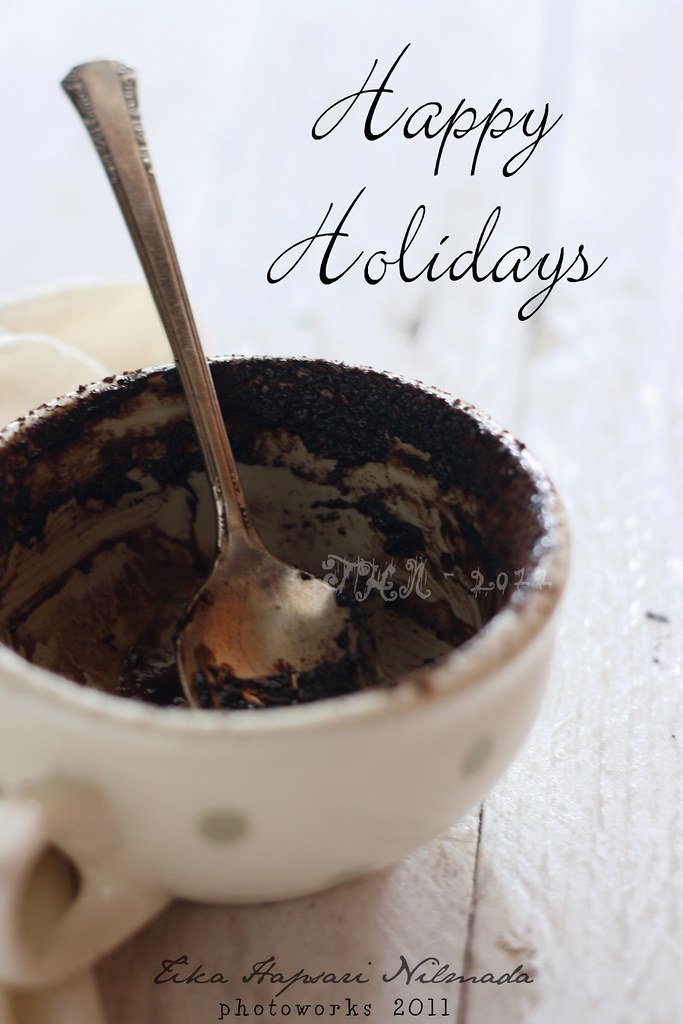
What does chocolate give to you ? If your answer is "pleasure" then we are the same :) Chocolate makes me happy and gives me feeling of excitement. The funny thing is I already feel the excitement only by looking at chocolate. Chocolate cake, chocolate ice cream, chocolate brownies, chocolate cookies, chocolate candy, chocolate bar, anything about chocolate. Mouth watering sweet temptations.

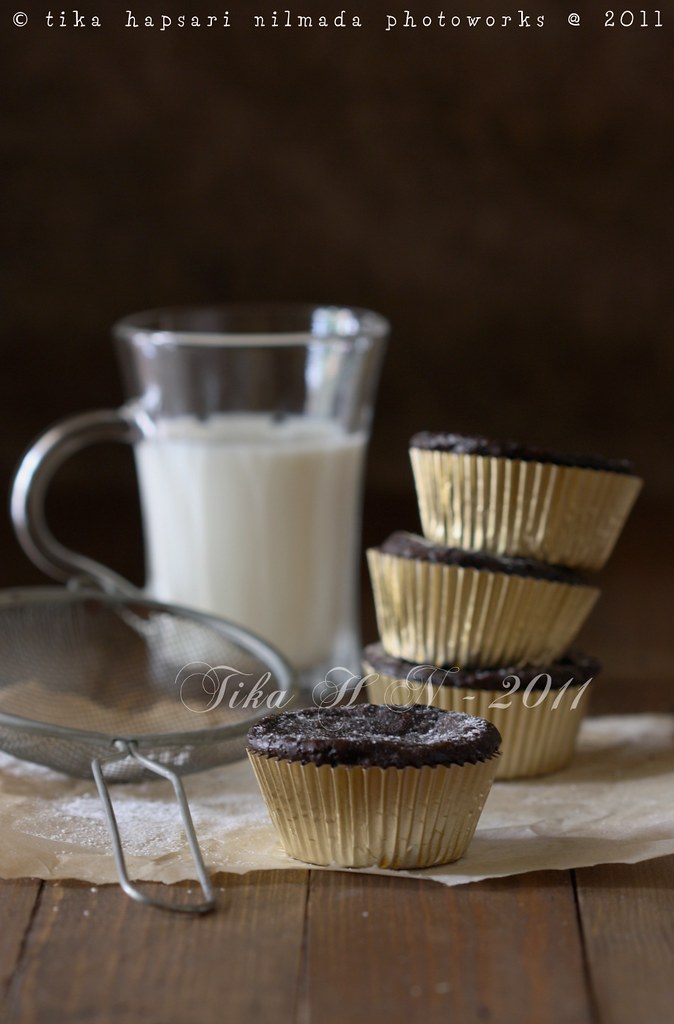
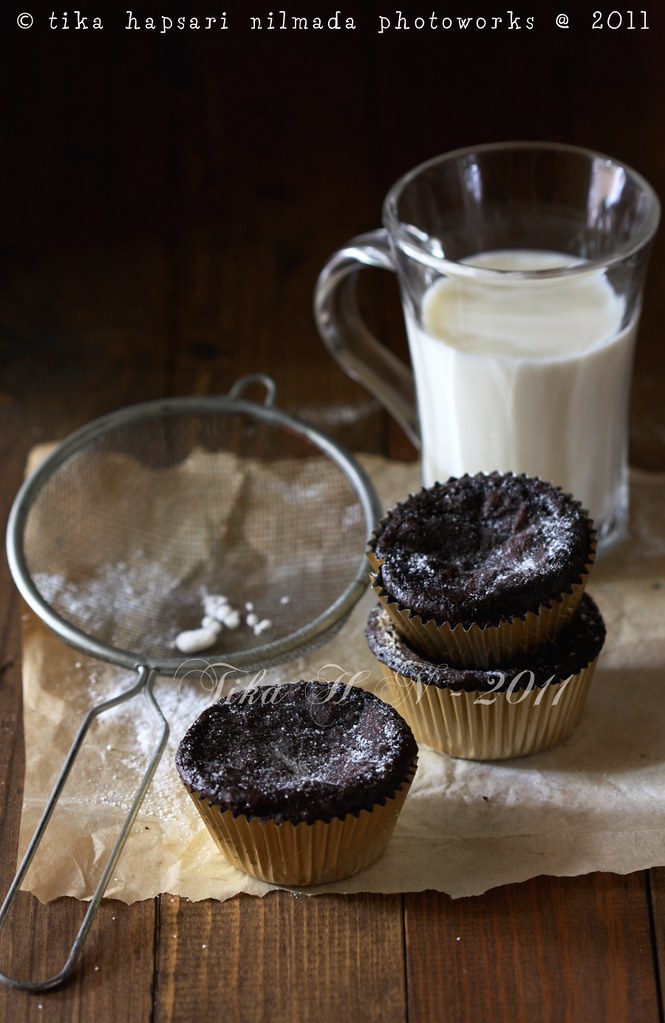
Same thing happened when I saw this recipe from Donna Hay. I was so excited to bake some. This actually a brownie cookies recipe, but something went wrong in the process. Thus, I put the batter into the paper cups and turned them into brownie cupcake :D But it was a pretty and yummy accident though ! 

Brownie in cups

Ingredients :
- 350g dark chocolate, chopped
- 40g butter
- 2 eggs
- 120 gr caster (superfine) sugar
- 1 teaspoon vanilla extract
- 35 gr plain (all-purpose) flour, sifted
- ¼ teaspoon baking powder, sifted

(Homemade) - Brownie in cups


Methods :

1. Preheat oven to 180°C (350°F).
2. Place 200g of the chocolate and the butter in a small saucepan over low heat and stir until melted and smooth. Set aside.
3. Place the eggs, sugar and vanilla in the bowl of an electric mixer and whisk for 15 minutes or until pale and creamy. Stir through the flour, baking powder, chocolate mixture and remaining chocolate and allow to stand for 10 minutes.
4. Spoon tablespoonfuls of the mixture at a time, onto cups lined with paper cups. Bake for 12 minutes. Allow to cool completely on trays.

Nela from Beloved Star is running a Foodography Photo Contest. If you wanna join the contest but you don't know the rules or wanna see the prizes, please click here. She told me that this contest is open internationally. So, pack your bag ! Choose one or two of your best food photos and send them to her.

TEXT


Enjoy....
Related Posts Plugin for WordPress, Blogger...